please visit my profile page to see all my blogs thanks
http://www.blogger.com/profile/08427350034167098841
A step-by-step guide to creating your own beautiful Blogger template. Learn about Blogger tags, how to use images, and how to tweak your template CSS.
 One of the nice things about Google's free Bloggerservice is that you can easily change the look of your blog. On a simple level, you can tweak the blog's fonts and colours via the tab in the admin area, and add, remove and reposition blog widgets with the tab.
If you want to alter your blog's design more radically, though, then you'll need to change your blog's template. There are many nice free Blogger templates available for download, but for a really professional job and a unique look, you'll want to create your own template.
This easy-to-follow tutorial walks you through all the steps needed to make your own Blogger template. To save time, you'll start from an existing HTML template — our freeTope PageKit — rather than creating a template entirely from scratch. However, once you've followed this tutorial you'll have the knowledge to create your own Blogger template from the ground up.
One of the nice things about Google's free Bloggerservice is that you can easily change the look of your blog. On a simple level, you can tweak the blog's fonts and colours via the tab in the admin area, and add, remove and reposition blog widgets with the tab.
If you want to alter your blog's design more radically, though, then you'll need to change your blog's template. There are many nice free Blogger templates available for download, but for a really professional job and a unique look, you'll want to create your own template.
This easy-to-follow tutorial walks you through all the steps needed to make your own Blogger template. To save time, you'll start from an existing HTML template — our freeTope PageKit — rather than creating a template entirely from scratch. However, once you've followed this tutorial you'll have the knowledge to create your own Blogger template from the ground up.
Overview
Here's how you're going to create your Blogger template:
- Download the Tope PageKit and extract it
- Create a test blog in Blogger for testing your template
- Open a copy of Tope's
index.html file in your text editor
- Replace the top chunk of the template code with the standard Blogger code
- Insert the CSS from the Tope template's style sheet,
style.css
- Remove the right-hand sidebar from the template
- Upload the template images and fix up the image URLs in the template
- Test the template
- Add the Blogger tags to the template
- Test again
- Tweak the template CSS to work with the Blogger markup
- Test the finished template
Ready? Let's get going!
1. Download the Tope PageKit
Grab the Tope PageKit zip file and extract it to a folder called tope on your computer. When you open the folder you should see the files that make up the Tope template, including index.html and style.css.
2. Create a test blog
It's a good idea to create a separate blog for developing and testing your template. This will allow you to play with the look of your template without affecting your main blog.To create your test blog, follow these steps:
- Log into your Blogger account.
- In the Dashboard, click .
- Enter a title, such as "My Test Blog", and a unique blog address (URL) — it doesn't matter what you use.
- Fill in the word verification section, then click .
- On the "Choose a template" page, click again.
- Your test blog has been created. Click the button.
3. Copy the PageKit's index.html file to a new Blogger template file
Most PageKits come with 2 template pages:
index.html for the site homepage, andpage.html for all of the site's inner pages
Blogger uses just 1 template page for all pages of a blog, so you'll base your Blogger template on the PageKit's index.html page and ignore the page.html file.
Now, open the tope folder on your hard drive and find the index.html file. Copy this file to a new file called tope.xml. This will be your Blogger template. Open tope.xmlfor editing in your favourite text editor (I like to use Notepad on Windows and TextWrangler or vim on the Mac).
4. Replace the top chunk of the PageKit's markup with Blogger's
A Blogger template contains various custom tags and attributes in its html and headelements. These tags are needed by Blogger to display the blog pages, so you'll need to replace these 2 elements in the tope.xml file with the following Blogger code:
<?xml version="1.0" encoding="UTF-8" ?>
<!DOCTYPE html PUBLIC "-//W3C//DTD XHTML 1.0 Strict//EN" "http://www.w3.org/TR/xhtml1/DTD/xhtml1-strict.dtd">
<html expr:dir='data:blog.languageDirection' xmlns='http://www.w3.org/1999/xhtml' xmlns:b='http://www.google.com/2005/gml/b' xmlns:data='http://www.google.com/2005/gml/data' xmlns:expr='http://www.google.com/2005/gml/expr'>
  <head>
    <b:include data='blog' name='all-head-content'/>
    <title><data:blog.pageTitle/></title>
    <b:skin><![CDATA[

/* Insert CSS Here */

]]></b:skin>
  </head>
To replace the code, follow these steps:
- Open
tope.xml in your text editor.
- Select the above chunk of code and choose .
- In
tope.xml, select everything from the start of the file down to the closing </head>tag, and choose .
- Save the
tope.xml file.
5. Insert the Tope CSS
Blogger templates use special elements to identify various parts of the template, such as the blog posts and sidebar widgets.
The first Blogger element you'll work with is called b:skin, and it's inside the headelement you just pasted in. Amongst other things, the b:skin element holds the template's CSS styles, so you need to insert Tope's CSS into this element. Follow these steps:
- In the
tope folder, open the tope.xml and style.css files in your text editor.
- Select the entire contents of the
style.css file and choose .
- In the
tope.xml file, select the /* Insert CSS Here */ line near the top of the code, and choose .
- Save
tope.xml.
6. Remove the right-hand sidebar
The Tope PageKit has a 3-column layout:
- The site title/menu column on the left (
<div id="page-header"> ... </div>)
- The main content column in the middle (
<div id="main-content"> ... </div>)
- A narrow sidebar column on the right (
<div id="sidebar"> ... </div>)
You'll use the left menu column to hold the Blogger sidebar widgets, and the main content column for the main Blogger content (i.e. the blog posts). This means that you don't need that right-hand sidebar column, so rip it out and extend the main content width to fill the gap.
To do this, first remove the <div id="sidebar"> ... </div> section from thetope.xml file. You should now have the following markup between your <!-- Content --> and <!-- End Content --> comments:
    <!-- Content -->

    <div id="main-content">

      <p>Lorem ipsum dolor sit amet, con sectetuer adipiscing elit, sed diam nonnumy nibh eeuismod tempor inci dunt ut labore et dolore magna ali quam erat volupat.  Ut wisi enim ad minim veniam, quis <a href="#">nostrud</a> exerci tation ullamcorper suscipt laboris nisl ut aliquip ex ea commodo consequat.  Duis autem vel eum irure dolor in henderit in vulputate velit esse consequat.</p>

      <p>Vel illum dolore eu feugiat nulla facilise at vero eos et accusam et ius to odio dignissim qui blandit prae sent luptatum zzril delenit aigue dous dolore et molestias exceptur sint occaecat cupidiata non simil pro vident tempor sunt in clulpa qui officia deserunt mollit anium ib est abor um et dolor fuga.  Et harumd dereud facilis est er expedit distinct.  Nam liber tempor cum soluta nobis eligend option congue nihil impediet doming id quod mazim placeat facer possim omnis voluptas assumenda est, omnis repellend.</p>

      <p>Temporibud auteui quinusd et aur office debit aut tum rerum neccessit atib saepe eveniet ut er molestia non recusand.  Itaque earud rerum hic ten tury sapient delectus au aut prefer zim endis dolorib asperiore repellat.</p>

    </div>

    <!-- End Content -->
Now remove the corresponding #sidebar selector from the CSS (inside the b:skinelement). Delete the following code:
/* Sidebar area */

#sidebar
{
  float: right;
  width: 190px;
  padding: 2px 10px 0 0;
  font-size: 0.9em;
  line-height: 1.2em;
}
Next, you need to increase the width of the main content area so it stretches to fill the gap where the sidebar was. To do this, find the #main-content selector in the CSS and change the width from 340 pixels to 550 pixels:
/* Main content area */

#main-content
{
  float: left;
  width: 550px;
}
7. Upload the template images and adjust the image URLs
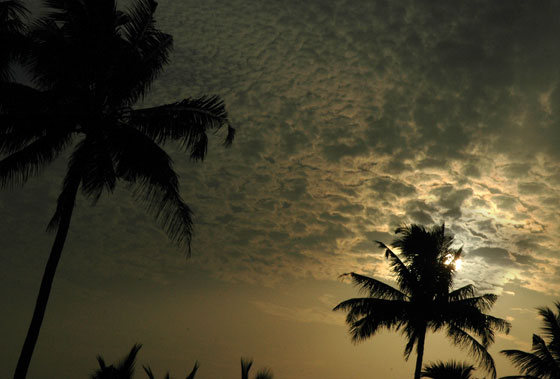
Tope's index.html template file uses 3 images:
palms-big.jpg (the top-right palm trees image)pinstripe.png (the repeating pinstripe page background)footer-rule.png (the white dotted border above the page footer)
You need to upload these images to the Web somewhere so that the blog template can use them. The easiest approach is to upload them to your own website (if you have one), although it's also possible — albeit fiddly — to upload them to Blogger by creating a blog post.
Here's where I uploaded my images:
The original Tope template references its images in an images folder relative to the template page. You'll need to adjust these references to point to the images you uploaded.
In tope.xml, find the references to:
palms-big.jpg (in the "main-image" img tag towards the bottom of the file)pinstripe.png (in the body CSS rule)footer-rule.png (in the #page-footer CSS rule)
and replace the URLs with those of your uploaded images. My new code looks like this (changes highlighted in bold):
<img id="main-image" src="http://www.elated.com/res/Image/articles/authoring/create-your-own-blogger-template/palms-big.jpg" alt="Palm trees" style="height: 379px;" />

body
{
  margin: 0;
  padding: 0;
  color: #393b4a;
  background: #d4d5c5 url(http://www.elated.com/res/Image/articles/authoring/create-your-own-blogger-template/pinstripe.png) repeat 0 0;
  font-family: Georgia, "Times New Roman", Times, serif;
  font-size: 0.85em;
  line-height: 1.3em;
}

#page-footer
{
  margin: 10px 0 0 0;
  padding: 20px 0;
  background: transparent url(http://www.elated.com/res/Image/articles/authoring/create-your-own-blogger-template/footer-rule.png) repeat-x 0 0;
}
8. Test the template
So far you've taken the Tope template file, added the Blogger html and head code, inserted the CSS from Tope's style.css file, uploaded the images, and fixed up the image URLs. How's it all looking so far?
To test your template:
- Log into your Blogger account.
- Find your test blog in the Dashboard and click its link.
- Click the tab.
- Click the button and choose the
tope.xml file on your hard drive, then click.
- You'll probably see a "Widgets are about to be deleted" warning message. Don't worry, as this is only a test blog. Just go ahead and click .
- Click the link to view your test blog.
You can see that your test blog now looks pretty much like the Tope homepage template, minus the right-hand sidebar which you removed previously:
The template so far — no Blogger tags yet
However, it doesn't look much like a blog! That's because the template body doesn't contain the required Blogger tags to display things like the blog posts and sidebar widgets. You'll add these tags in the following step.
9. Add the Blogger tags
You now need to replace the static content in the template with various Blogger tags to display your blog posts, sidebar widgets, and other dynamic content. The most common types of Blogger tags are:
b:section tags, for marking out broad sections of the page such as the header, footer, sidebar, and main content areab:widget tags, for inserting specific widgets (also called gadgets) in the page, such as the blog title/description, the Blog Archive links, and the blog posts themselves.
9a. Replace the Site Title section with the Blogger "header" section
First, you'll replace the big "Site Title here" text in the Tope template with the blog title, and the "Introduce the site here with a little bit of copy" text below it with the blog description. The following Blogger tags can be used to display the blog title and description:
    <b:section class='header' id='header' maxwidgets='1' showaddelement='no'>
    <b:widget id='Header1' locked='true' title='My Blog (Header)' type='Header'/>
    </b:section>
To insert the tags, follow these steps:
- Select the chunk of code above and choose .
- Open
tope.xml in your text editor and select the code between the <!-- Site Title --> and <!-- Menu --> comments.
- Choose to replace this code with the copied code.
Your Site Title section in tope.xml should now look similar to this:
    <!-- Site Title -->

    <b:section class='header' id='header' maxwidgets='1' showaddelement='no'>
    <b:widget id='Header1' locked='true' title='My Blog (Header)' type='Header'/>
    </b:section>
9b. Replace the Menu section with the Blogger "sidebar" section
Tope's Menu section fills the rest of the left-hand column below the site title. You're going to use this area to display all your Blogger sidebar widgets, rather than Tope's default navigation menu.
Using the same technique shown in Step 9a above, replace the code between the <!-- Menu --> and <!-- End Menu --> comments in tope.xml with the code shown below. This creates the Blogger "sidebar" section and adds 3 default widgets: Followers, Blog Archive, and Profile (About Me):
    <!-- Menu -->

    <b:section class='sidebar' id='sidebar' preferred='yes'>
    <b:widget id='Followers1' locked='false' title='Followers' type='Followers'/>
    <b:widget id='BlogArchive1' locked='false' title='Blog Archive' type='BlogArchive'/>
    <b:widget id='Profile1' locked='false' title='About Me' type='Profile'/>
    </b:section>

    <!-- End Menu -->
9c. Replace the main content dummy text with the Blogger "main" section
You're now going to replace the dummy text in the Tope main content area with the Blogger "main" section tags. This section displays your actual blog posts.
Using the technique shown in Step 9a, replace the dummy Lorem Ipsum text inside the"main-content" div in tope.xml with tags for the Blogger "main" section and "Blog" widget, as shown below:
    <div id="main-content">
      <b:section class='main' id='main' showaddelement='no'>
      <b:widget id='Blog1' locked='true' title='Blog Posts' type='Blog'/>
      </b:section>
    </div>
9d. Add the Blogger "footer" section
Finally, you need to add the Blogger "footer" section to the Tope page footer. (You'll keep the PageKits copyright notice and links, as required by the Terms of Use for free PageKits.) The footer won't contain any widgets for now.
Add the "footer" section just above the copyright notice code, as shown below:
<!-- Page Footer -->
<div id="page-footer">
<b:section class='footer' id='footer'/>
<p>ELATED PageKits © 1996-2008 <a href="http://www.elated.com/">ELATED</a> & <a href="http://www.pagekits.com/">PageKits.com</a></p>
</div>
10. Test the template again
Now you can test the dynamic areas of your template. First, add some test content to your blog:
- Click your test blog's tab.
- Enter some dummy text for the field, then click .
- Click the tab.
- Click , then enter some dummy text for the post title and content. You may also like to add some labels. Click when you're done.
- Repeat the last step a couple of times, so that your blog contains a few dummy posts.
Next, upload your tope.xml template again, as shown in Step 8. View your test blog. You can see that it now looks more like a blog, with your blog header, title, description, sidebar widgets, and blog posts all in place:
The template with Blogger tags inserted
However, things look a bit rough round the edges. For example, some of the headings are too small, and the spacing of various elements is a bit off. This is due to incompatibilities between the Tope CSS and the HTML generated by Blogger. You'll fix these in the following step.
11. Tweak the CSS
In this step you'll improve the appearance of your tope.xml template by making some tweaks to the CSS in the b:skin section at the top of the file.
11a. Sidebar positioning
It would be good if the sidebar widgets (Followers, Blog Archive and so on) started further down the sidebar, lining up with the date heading in the blog posts area. To do this, you can give the #header element, which comprises the blog title and description, a fixed height. Add the following CSS to the end of the existing CSS in the tope.xmlfile:
#header
{
  height: 336px;
}
11b. Blog Archive spacing
The Blog Archive links are bit cramped. To space them out vertically, add the following CSS:
#page-header li
{
  margin: 0;
  padding: 0 0 .25em 15px;
  text-indent: -15px;
  line-height: 1.5em;
}
11c. Link underlining
Some links are underlined, while some aren't. For consistency, you can remove underlines from all links, apart from those in the post bodies, by adding the following CSS:
a
{
  text-decoration: none;
}

.post-body a
{
  text-decoration: underline;
}
11d. The About Me section
The About Me section features the author photo and description. Currently this section doesn't have any CSS applied, so it looks pretty messy. You can fix this by adding the following CSS:
.profile-img
{
  float: left;
  margin: 5px 5px 5px 0;
  padding: 0;
  border: 1px solid #333;
}

.profile-data
{
  margin: 0;
  font-weight: bold;
  line-height: 1.6em;
  font-size: 0.8em;
}

.profile-datablock
{
  margin: 0.5em 0 0.5em;
}

.profile-textblock
{
  margin: 0;
  line-height: 1.2em;
  font-size: 0.9em;
}

.profile-link {
  font-size: 0.9em;
}
11e. Line spacing
The lines of text look a bit cramped vertically. To increase the line spacing, change theline-height property in the body selector from 1.3 ems to 1.5:
body
{
  margin: 0;
  padding: 0;
  color: #393b4a;
  background: #d4d5c5 url(http://www.elated.com/res/Image/articles/authoring/create-your-own-blogger-template/pinstripe.png) repeat 0 0;
  font-family: Georgia, "Times New Roman", Times, serif;
  font-size: 0.85em;
  line-height: 1.5em;
}
11f. Level 3 headings
The post titles, which are h3 heading elements, look far too small. Since they're links, they also inherit the link colours. It would be nicer if they had their own colour.
To fix both of these issues, simply increase the h3 font size from 0.8 ems to 1.3 in the CSS, and add selectors to style the h3 links:
h3
{
  font-weight: bold;
  font-size: 1.3em;
  margin: 0 0 10px 0;
}

h3 a:link, h3 a:active, h3 a:visited
{
  color: #a0854f;
}

h3 a:hover
{
  color: #000;
}
11g. Post footers
The post footers ("Posted by...") could do with a little separation from the post bodies, and it would be good to increase the vertical space between lines of text in the footers. Add the following CSS to space the footers vertically and give them a grey italic font:
.post-footer
{
  margin: 1em 0;
  line-height: 1.6em;
  font: italic normal 100% Georgia, "Times New Roman", Times, serif;
  color: #666;
}

.post-footer div
{
  line-height: 1.6em;
}
11h. Separator bars
It would be nice to have some dotted horizontal bars separating various elements in the page. Add these into tope.xml by adding the following CSS:
.post
{
  margin: .5em 0 1.5em;
  border-bottom: 1px dotted #333;
  padding-bottom: 1.5em;
}

.sidebar .widget, .main .widget
{
  border-bottom: 1px dotted #333;
  margin: 0 0 1.5em;
  padding: 0 0 1.5em;
}
11i. Pager links
Individual post pages contain "Newer Post" / "Home" / "Older Post" links at the bottom of the page. You can line these up nicely by adding the following CSS:
#blog-pager
{
  text-align: center;
  margin-bottom: 2em;
}

#blog-pager-newer-link
{
  float: left;
}

#blog-pager-older-link
{
  float: right;
}
12. Test the finished template
You've now tweaked your template's CSS to get everything looking good. Time to test your finished template!
Re-upload your tope.xml template, as shown in Step 8. View your test blog. It should look much more polished. Try adding a few comments to your posts, and make sure everything looks right. Here's how a blog post page should look:
The finished template showing a blog post page
Nice work! If you want, you can download the finished tope.xml file.
In this tutorial you've learned how to create a basic Blogger template. Blogger lets you take things further, though. For example, you can fully customize each widget by inserting data tags inside the widget tags, and you can even create your own widgets.
Another nice enhancement — particularly if you want others to use your template — is to make the template's fonts and colours tweakable via the Blogger tab. To do this, you need to insert Blogger variables into your template.
Happy blogging! :)


